


Car Seat Safety Guidelines for 2026: Rules by Stage
In 2025, 73.7% of 102,592 car seats inspected by Child Passenger Safety Technicians were used or installed incorrectly, according to the National Digital Car Seat Check Form fact sheet. That's a finding about inspected seats, not every family's car seat. Still, it highlights something parents deserve to hear: keeping a child protected takes more than getting the initial installation right.
Good car seat safety guidelines follow the child and the equipment over time. Choose the right stage, install the seat correctly, check the fit as your child grows, and keep caregivers and recall information up to date. You don't have to memorize everything. You need a routine you can repeat.
Disclosure: Hiccapop makes the UberBoost inflatable booster car seat mentioned in this article.
The Four Stages of Car Seat Rules at a Glance
Think of car seat safety as a growth chart with four marks. Your child starts at the bottom and climbs one step at a time, and the seat has to match the mark they are on right now.
Rear-facing seat
Who it fits: Infants and toddlers
Keep until: Seat's labeled rear-facing height or weight limit
Key rule: Always rear-facing under age 1, according to NHTSA's car seat recommendations
Forward-facing harness and top tether
Who it fits: Children past the rear-facing limit
Keep until: Seat's forward-facing height or weight limit, according to CDC guidance on keeping children in a harness until they reach the seat's forward-facing limit
Key rule: Harness snug and top tether attached
Booster seat
Who it fits: Children who outgrew the harness but not the adult belt
Keep until: Adult belt fits correctly, usually about ages 9 to 12, according to the CDC's child passenger safety guidance
Key rule: Lap belt low on thighs, shoulder belt across chest
Adult seat belt
Who it fits: Children who pass the belt-fit test
Keep until: Ongoing
Key rule: Back seat, belt low and across the shoulder
The stages follow fit, not a birthday schedule. A child does not graduate because a sibling switched at that age or a friend stopped using a booster. Every stage shown belongs in the back seat, and moving up too soon gives less protection.
Rear-facing seats cradle infants and growing toddlers within the seat's permitted limits. Outgrowing an infant carrier often means moving to a larger seat that still faces the back. That keeps head, neck, and spine better supported in a crash.
Forward-facing seats use an internal harness to hold the child plus a top tether to limit forward movement of the top of the seat. A booster works in a different way. It lifts the child so the vehicle's own lap and shoulder belt sits in the right places.
Measure Before You Match a Stage
Find your child's current height and weight, then open the manual to the instructions for the stage you are using. Check these three points:
- Height and weight limits: Both matter. Reaching either applicable maximum can mean the current mode is outgrown.
- Head position: For rear-facing seats, follow the manual's head-clearance requirements, not a guess based on legroom. Long legs alone do not mean it is time to turn forward.
- Harness position: For forward-facing seats, verify that the available harness settings still meet the manufacturer's fit instructions.
Weight tells only part of the story. A child can be under the weight maximum yet too tall for that mode, so the tape measure counts as much as the scale.
Practical rule: Write down your child's measurements and match them to the seat label. If an age-based assumption disagrees with the label, follow the seat's limits.
Keep a photo of the readable label on your phone. It makes checking the model and limits easier when you are shopping, traveling, or explaining the setup to another caregiver.
How Much Protection a Correct Seat Provides and Which Standards Apply
NHTSA estimates that child safety seats reduce fatal-injury risk by 71% for infants younger than one and 54% for children ages one through four in passenger cars, with corresponding reductions of 58% and 59% in light trucks, according to its child passenger safety materials.
The graphic summarizes why correct restraint use matters.

Those same NHTSA materials estimate that restraints saved 11,606 children younger than five between 1975 and 2024 and describe a study finding that approximately 46% of car seats were installed incorrectly. The protection figures and installation findings answer different questions: restraints can be highly effective, while families can still need help using them correctly.
These aren't promises about an individual crash. They're a reason to pay attention to the details you can control: the restraint's suitability, the installation, and the way the child is buckled.
Standards, State Laws, and Seat Instructions
In the United States, child restraints must meet the applicable federal requirements under Federal Motor Vehicle Safety Standard 213. Look for the compliance statement on the seat label rather than relying on a seller's description.
Our UberBoost meets FMVSS 213 for booster seats in the United States. Meeting a product standard doesn't replace checking whether a particular child and vehicle are suitable for that product.
State child passenger laws establish legal requirements and differ by location. Check your state's current rules, but don't treat permission under a law as proof that your child has outgrown a more protective stage.
Use a demonstration alongside, not instead of, your own manuals.
Keep these references together:
- Seat information: The label, model details, and current manual.
- Vehicle instructions: Approved seating positions, anchors, and belt-locking directions.
- State requirements: The current rules for where you'll drive.
The manual supplies the seat-specific details that a general law or video can't.
How to Install a Rear-Facing Seat Step by Step
A rear-facing seat does more than face the opposite direction. In a frontal crash, its shell distributes forces across the child's back, head, and neck, as explained in NHTSA's rear-facing installation guidance. Turning a child forward prematurely removes that support and increases stress on the vulnerable neck.
Install when you have time to work without rushing. Put both manuals within reach, clear loose items from the seating position, and identify the seat's rear-facing belt path before threading anything.
Build the Installation in Order
- Read both manuals. The car seat manual explains its permitted setup; the vehicle manual identifies approved locations, anchors, and belt operation. Neither replaces the other.
- Choose a suitable back-seat position. Never put a rear-facing seat in front of an active passenger airbag. Check any required clearance from the front seat so the driver and passenger can also sit properly.
- Choose the permitted securing method. Use the vehicle seat belt or lower anchors according to both manuals, and don't combine them unless expressly allowed. Follow any lower-anchor limits and route the belt or connector strap through the rear-facing path.
- Set the recline and harness height. Use the seat's recline indicator as directed for your child, with the vehicle parked on level ground when checking it. Rear-facing shoulder straps should enter the seat at or below the child's shoulders.
- Position the child before tightening. Set their back and bottom flat against the seat and remove bulky outerwear or blankets from beneath the harness. Puffy material can compress during a crash, leaving slack that wasn't obvious when buckling.
- Buckle and adjust the harness. Remove slack according to the manual until you can't pinch excess harness webbing at the shoulder. Place the chest clip at armpit level to help keep the shoulder straps positioned correctly.
Catch the Wrong-Path Problem
A convertible seat may have separate belt paths for different modes. Threading the belt through the wrong path can leave a seat looking secured even though it isn't installed as designed. Trace the entire route with your hand and compare it with the manual's diagram.
For a plain-language companion to the manuals, NHTSA's car seat installation instructions and videos offer another resource to review before practicing.
Don't solve an awkward fit with extra cushions, unapproved inserts, or improvised recline supports. Use only the adjustments and accessories the manufacturer permits. The installation isn't finished until it passes the tightness check.
When to Move Forward and When to Switch to a Booster
The seat's limits decide when rear-facing ends; the child's fit decides when a booster can end. These are separate decisions, and neither should happen because the child wants a grown-up seat.
When the current rear-facing mode is outgrown, check whether another appropriate rear-facing seat is an option before assuming forward-facing is the only choice. Our guide to how long to keep a child rear-facing can help you think through that transition.
Set Up the Forward-Facing Stage
The top tether is the strap that connects the upper part of a forward-facing restraint to a designated vehicle anchor. It helps limit forward movement, including head movement, during a crash. A nearby cargo hook isn't automatically a tether anchor.
Follow this installation sequence:
- Adjust the harness position to the setting the seat manual specifies for your child's current height.
- Secure the seat using the vehicle belt or lower anchors as both manuals allow, observing the applicable limits.
- Attach and tighten the top tether at the anchor identified in the vehicle manual, then test the installation at the belt path.
For a child who falls asleep, a harness also provides a different kind of positioning support from a booster. Booster readiness requires the child to sit correctly without leaning out of the vehicle belt.
Separate Booster Readiness From Belt Readiness
A child enters a booster after outgrowing the forward-facing harness and meeting the booster manufacturer's requirements. Leaving the booster comes later, when the adult belt fits without help.
Check the child in the actual vehicle seat:
- Back and knees: The child sits all the way back, with knees bending comfortably over the seat edge.
- Lap belt: It rests low across the upper thighs, not across the stomach.
- Shoulder belt: It crosses the chest and shoulder, not the neck or face.
- Whole-trip posture: The child can maintain that position throughout the ride, including when tired.
Slouching to bend the knees or putting the shoulder belt behind the back means the setup fails. If any part of the adult-belt fit check fails, keep the booster. Repeat the assessment in another vehicle because seat depth and belt geometry can change the fit.
Passing the belt-fit check in one car doesn't establish readiness in every car.
Families comparing legal requirements with fit decisions can check their state's current rules in the IIHS summary of child safety seat laws by state. Use state-specific information for the legal question and your child's actual fit for the restraint decision.
Five Checks to Run After Every Installation
Treat installation checks as pass-or-fail questions, not an overall impression that the seat feels sturdy. A seat can pass the harness check and still fail the attachment check.
Check the Connection and the Child
- Does the seat stay within the movement limit? Grip it at the belt path and test side-to-side and front-to-back movement; CDC's child passenger safety guidance specifies no more than one inch. Excess movement means the seat isn't adequately secured to the vehicle and may move farther during a crash.
- Does the harness pass the pinch test? Try to pinch a fold of harness webbing at the child's shoulder. If you can grasp excess webbing, remove the slack and test again, checking that the straps aren't twisted.
- Is the chest clip at armpit level? A clip sitting on the belly or up near the neck needs repositioning. Check it after tightening because adjustments can shift its position.
- Is the forward-facing top tether attached correctly? Verify the actual anchor, the routing, and the adjustment. Don't count a strap resting behind the seat as an attached tether.
- Are the belt path and locking method correct? Follow the belt through the entire route and confirm that the required locking mechanism is engaged. A buckled belt alone doesn't establish a secure installation.
Test at the belt path rather than pulling on the headrest or upper shell. Movement away from the attachment point doesn't answer the same installation question.
What to Do When Something Fails
If the attachment check fails, undo and reinstall using the manual's sequence. If a harness check fails, correct the child's position or harness adjustment before driving.
Never wedge blankets beside the child or add padding to make a loose setup feel tighter. Those additions don't correct the attachment and may introduce an unapproved change.
Troubleshooting reminder: Fix the part that failed. A tighter harness can't compensate for a loosely installed seat.
Retest after moving the seat, after an abrupt stop or bump that raises concern, and whenever growth changes the child's fit. After a crash, follow the manufacturer's crash-replacement instructions rather than relying on a successful movement test.
If a careful reinstall still won't pass, contact a certified Child Passenger Safety Technician. Ask local hospitals, fire departments, or community safety programs about inspection appointments and whether checks are free. The goal is to leave knowing how to reproduce the installation yourself.
Pre-Trip Checks, Recalls, and Caregiver Handoffs
Before the next drive, check what can change between installations: your child's size, the seat's condition, and who last adjusted it. A correctly installed restraint still needs to be appropriate and intact.
Make the Pre-Trip Routine Repeatable
- Current fit: Confirm that the child remains within the limits for the mode being used, including rear-facing limits where applicable.
- Correct location: Keep the restraint in an approved back-seat position.
- Usable condition: Look for damaged components, missing parts, unreadable labels, or an expired service life.
- Ready to ride: Remove harness slack and make sure nothing interferes with buckling or adjustment.
Keep this checklist available for everyone who transports your child.
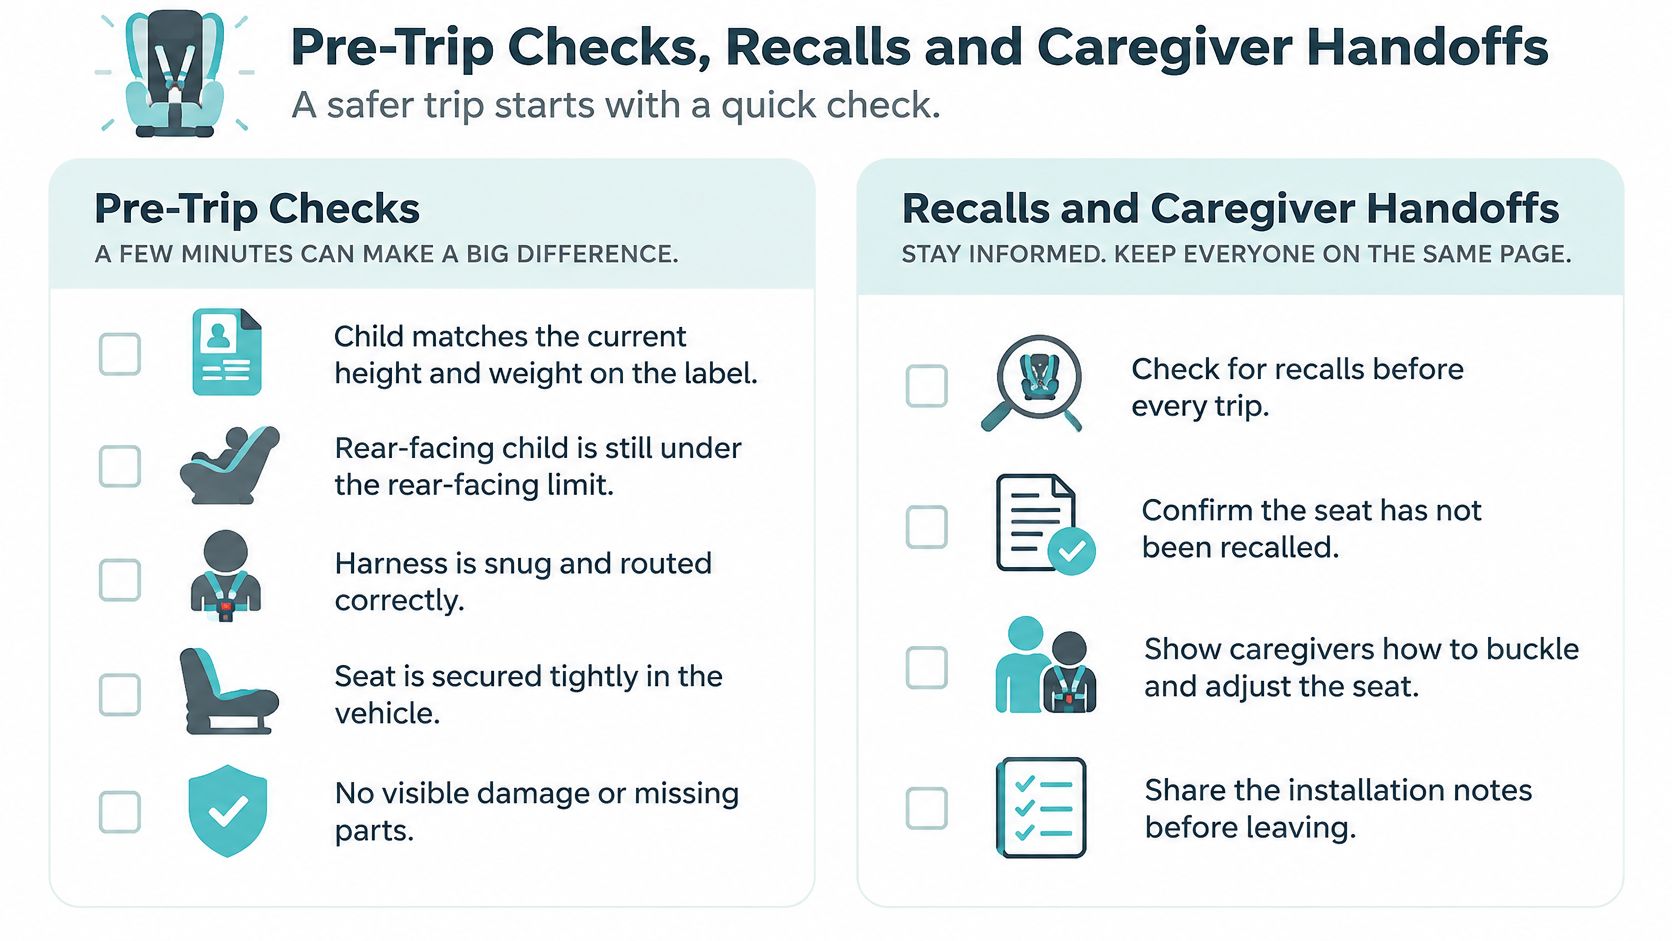
Build the habit alongside ordinary vehicle preparation, like adjusting mirrors and fastening your own seat belt.
Keep Recall Information Current
NHTSA reported that nearly 745,000 car seats were recalled in 2025, according to its consumer safety recall alert. Some recalls involve defects that correct installation can't fix. For example, NHTSA recall 25C-006 for the Safety 1st Grow and Go Sprint involved headrest foam that could break off, with 13 reported cases of children putting pieces in their mouths.
Find the exact model and manufacture date on the label, register the seat, and check official recall information periodically. Before driving, confirm that any known recall has been addressed according to its instructions. Follow the specific remedy, which may involve a repair or replacement component rather than discarding the entire seat.
Avoid secondhand seats with unknown histories. You need to establish their condition, service life, parts, recall status, and relevant crash history, not just whether the cover looks clean.
Show Caregivers, Then Have Them Practice
Give babysitters and grandparents the manual and seat-specific notes. Demonstrate buckling, harness tightening, and tether use, then ask them to perform the routine while you watch. A return demonstration reveals misunderstandings that a quick verbal explanation can miss.
Repeat the handoff after growth adjustments, seat changes, or vehicle changes. For trips involving rentals or unfamiliar cars, use our traveling with car seats guide while planning the equipment and installation.
Common Car Seat Installation Mistakes and How to Fix Them
In 2024, 67% of the 91,618 car seats inspected through the National Digital Car Seat Check Form were improperly installed or used, according to AAA Foundation for Traffic Safety analysis. These were inspected seats, so the finding shouldn't be treated as a count of all seats on the road.
The useful response isn't blame. It's identifying the specific mistake and applying the matching fix.
Match the Problem to the Repair
Loose installation
Why it is risky: Excess movement at the belt path permits unwanted seat movement
Fix: Tighten the permitted belt or lower-anchor attachment, then retest
Top tether unused on forward-facing seat
Why it is risky: Upper-seat and head movement aren't controlled as intended
Fix: Attach the tether to the anchor named in the vehicle manual
Harness too loose
Why it is risky: Slack lets the child move before the harness restrains them
Fix: Tighten until no excess webbing pinches at the shoulder
Bulky coat under harness
Why it is risky: Compression creates slack
Fix: Remove the coat, buckle snugly, then place it over the secured harness
Seat in front of active airbag
Why it is risky: Airbag force can strike the child
Fix: Move the restraint to an approved back-seat position
Turning forward too early
Why it is risky: Removes rear-facing support before the child needs to transition
Fix: Keep using a suitable rear-facing seat within its limits
Booster used too early
Why it is risky: The child may not fit or remain positioned correctly
Fix: Keep an appropriate harnessed seat until the child meets booster requirements
Missing or altered parts
Why it is risky: The restraint may not perform as tested
Fix: Use only manufacturer-approved parts and follow the manual
The booster mistake deserves particular care. Booster readiness isn't the same as passing the adult-belt test without a booster. A child can need a booster precisely because the vehicle belt alone still fits badly.
Avoid Fixes That Create Another Problem
A tired child's head position can tempt caregivers to add a strap, pillow, or head support. Don't assume an accessory is approved because it's sold for car seats. Our discussion of a head holder for a car seat helps frame the questions to ask before changing the restraint.
Say a grandparent notices that the child looks uncomfortable and loosens the harness. The better response is to stop, check the child's position, inspect for twisted straps, and verify the permitted recline. Comfort adjustments must stay within the seat's instructions.
Use this list to identify the problems your checks revealed. Correct the attachment and routing problems before making final harness adjustments. Some fixes involve tightening a strap; others require removing the seat and starting again.
If a part is missing, stop improvising and obtain the manufacturer's approved solution. Tape, substitute hardware, and extra padding can't establish that a restraint will work as designed.
Frequently Asked Questions
When should my child switch from rear-facing to forward-facing?
When they reach the rear-facing height or weight limit on their seat's label, not at a set age. Children under 1 should always ride rear-facing. If your current seat's rear-facing mode is outgrown, check whether another seat with higher rear-facing limits is an option before turning forward.
How do I know if my car seat is installed tightly enough?
Grip the seat at the belt path and test it side to side and front to back. It shouldn't move more than one inch. Test at the belt path, not the top of the seat.
When can my child stop using a booster seat?
When the adult seat belt fits correctly without it, usually around ages 9 to 12. The lap belt should sit low on the upper thighs, the shoulder belt should cross the chest and shoulder, and your child should be able to sit that way for the whole trip. Check the fit in each vehicle they ride in.
Where should the chest clip go?
At armpit level. Recheck it after tightening the harness, since adjustments can shift its position.
Can my child wear a winter coat in their car seat?
Not a bulky one. Puffy material compresses in a crash and leaves slack in the harness. Remove the coat, buckle your child snugly, then place the coat or a blanket over the secured harness.
Is it safe to use a secondhand car seat?
Only if you know its full history: condition, expiration date, all original parts, recall status, and whether it's been in a crash. If you can't confirm those, choose a different seat.
Run the pre-trip list before your next drive. If any item remains unclear, arrange a technician check rather than guessing.
Our UberBoost Inflatable Booster Car Seat comes with care and assembly instructions on its product page. Review the product information and instructions, then check any seat you're considering against your child's stage and your vehicle's requirements.
Sources
- National Digital Car Seat Check Form, 2025 fact sheet
- NHTSA, Car Seats and Booster Seats: Recommendations
- NHTSA, Child Passenger Safety (Traffic Safety Facts)
- NHTSA, Rear-Facing Car Seat Installation
- NHTSA, Consumer Safety Recall Alert (2025 car seat recalls)
- NHTSA, Recall 25C-006: Safety 1st Grow and Go Sprint
- CDC, About Child Passenger Safety
- CDC, Child Passenger Safety: Prevention
- AAA Foundation for Traffic Safety, National Digital Car Seat Check Form analysis (2024)
- IIHS, Child Safety Seat Laws by State
- eCFR, 49 CFR 571.213 (FMVSS 213)