


How to Pack a Diaper Bag Like a Pro for Any Outing
Let's be honest—that diaper bag is so much more than a place to stash diapers and wipes. It’s your mobile command center, the one thing that stands between you and a full-blown meltdown (yours or the baby's) when you're out and about. But before we get into the nitty-gritty of what to pack, let's change how we think about this essential piece of gear.
A smartly packed diaper bag isn't just about being organized for the sake of it. It's about saving yourself from stress, frantic searching, and that sinking feeling of, "Ugh, I know I forgot something." This guide will help you build a core packing system you can tweak for any trip, whether it's a quick run to the store or a cross-country flight.
More Than Just a Bag: An Essential Parenting Tool
Modern parents are constantly on the move, and we need gear that can keep up. The diaper bag has come a long way from a simple tote, evolving into a stylish, multifunctional accessory. This isn't just a trend; the global market for diaper bags was valued at a whopping USD 747.1 million and is on track to reach USD 921.7 million by 2030. That growth speaks volumes about how much parents today value gear that makes life simpler.
Just as focusing on pre-natal planning and self-care is key before the baby arrives, mastering your diaper bag system will be your secret to smoother, happier outings afterward.
Why a System Beats a Simple Checklist
Checklists are a great starting point, but what really prepares you for the beautiful chaos of parenting is a system. I want you to start thinking of your diaper bag as a portable nursery, with everything organized and ready to go at a moment's notice.
Shifting to this mindset does a few powerful things for you:
- It cuts down on decision fatigue. You'll no longer have to second-guess yourself or scramble at the last minute.
- You can react faster. When everything has its place, you can grab that pacifier, wipe, or snack in seconds.
- You feel more in control. A messy, disorganized bag only adds to the stress of a public tantrum. An organized one helps you feel calm and collected.
A reliable diaper bag system is your secret weapon. It’s the difference between fumbling for a lost burp cloth and calmly handling whatever your baby throws at you.
Adopting this approach turns packing from a daily chore into a quick, automatic routine. You'll build the muscle memory to restock and adapt your bag for any outing without having to start from scratch every single time.
Building Your Everyday Diaper Bag Foundation
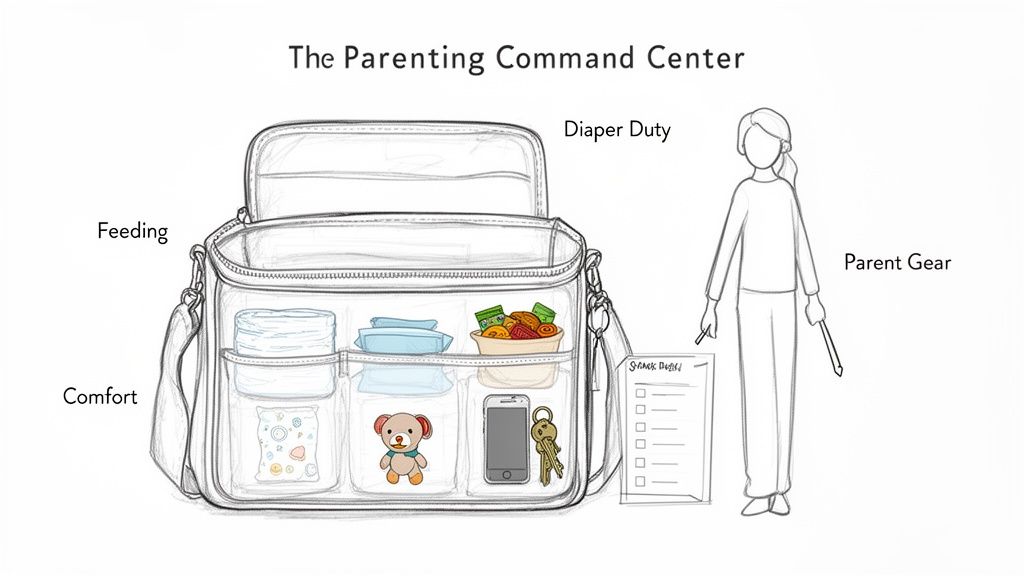
Think of your everyday diaper bag as your command center. This is the setup you'll rely on for all those quick trips—a jaunt to the park, a grocery run, or coffee with a friend. Getting this baseline right means you’re always ready to walk out the door.
Instead of just tossing everything in, let’s get organized with a “zone” system. By grouping similar items together, you’ll be able to grab exactly what you need in seconds, even with a fussy baby on your hip. This isn’t just about being tidy; it's about building a packing reflex. Once you have this foundation down, prepping for a longer trip is as simple as adding a few extras, not starting over from scratch.
The Diaper Duty Zone
This is mission control—the pocket or pouch you'll reach for most often. Keeping these items grouped together in one spot is a total game-changer, trust me.
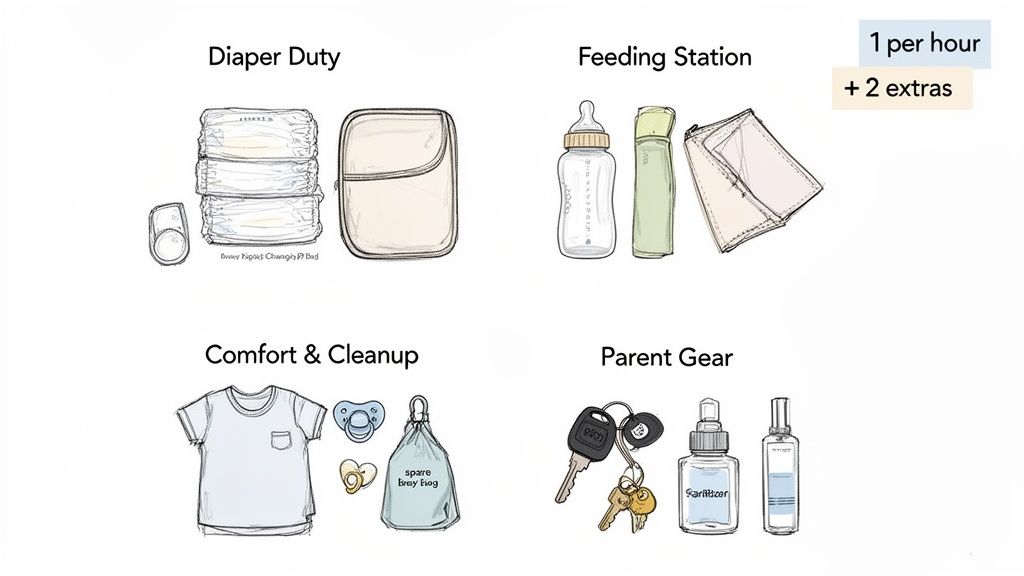
- Diapers: Here's the golden rule I learned early on: pack one diaper for every hour you plan to be out, and then toss in two extras for good measure. A three-hour outing? That means five diapers. It might feel like a lot, but you’ll be glad you have them when a surprise blowout happens.
- Wipes: A travel-sized pack is your best friend. I love the kind with a plastic snap-top clutch; they keep the wipes from drying out and are so much easier to open with one hand.
- Changing Pad: Most diaper bags come with a portable one, which is great. If yours didn't, a simple, foldable, wipe-clean pad is a must for tackling those questionable public changing tables.
- Diaper Cream: Just a small, travel-sized tube will do. It’s all you need to soothe any irritation that pops up while you're out.
The Feeding Station
Whether you're breastfeeding, bottle-feeding, or your little one is on solids, this zone is all about making sure they can eat comfortably anywhere. Insulated pockets are a lifesaver here for keeping milk or formula at the right temperature.
For bottle-fed babies, pack pre-measured formula in a dispenser alongside a clean bottle filled with water. If you're nursing, a lightweight cover can offer some privacy if you want it, and don't forget to pack a few breast pads for yourself. And, of course, a trusty burp cloth (or two!). You can never have too many.
The Comfort and Cleanup Crew
This is your "uh-oh" kit. It’s for the messes, the meltdowns, and everything in between. The absolute MVP of this zone is a wet/dry bag—it’s perfect for sealing away soiled clothes or containing a leaky bottle until you get home.
A complete spare outfit is non-negotiable. From spit-up incidents to diaper disasters, you will be incredibly grateful you have a fresh onesie and pants ready to go at a moment's notice.
A few other things I always keep in this zone:
- Pacifiers: If your baby takes one, bring at least two. One is guaranteed to fall on the grimiest floor imaginable.
- A Small Toy: A favorite teether or a small, soft toy can work wonders as a distraction during a long wait or a tricky diaper change.
- Disposable Placemats: For older babies and toddlers, these are genius. Just stick one on a restaurant table or public highchair for an instant clean eating surface.
The Parent Gear Zone
Hey, your stuff matters, too! Dedicate an easy-to-reach pocket—usually one on the front or side of the bag—for your own essentials. This stops you from having to dig past diapers and toys just to find your car keys.
Make sure this zone has your wallet, keys, phone, and hand sanitizer. A portable phone charger can also be a lifesaver. By keeping these items separate, you can grab what you need without turning the whole bag upside down.
To make things even easier, here's a quick checklist you can use to double-check your bag before heading out the door.
Everyday Outing Essentials Checklist
| Category | Must-Have Items | Pro Tip |
|---|---|---|
| Diaper Duty | Diapers (1 per hour + 2 extra), travel wipes, changing pad, diaper cream. | Use a separate pouch or a dedicated compartment to create a quick-grab "diaper kit." |
| Feeding | Bottle with formula/water, nursing cover, breast pads, burp cloth. | Pack one extra burp cloth. You’ll always find a use for it. |
| Comfort & Cleanup | Full spare outfit, pacifiers (2), small toy or teether, wet/dry bag. | Choose a toy that can be easily wiped down or washed. |
| Parent Gear | Wallet, keys, phone, hand sanitizer, portable charger. | Use a front or exterior pocket so your essentials are always within reach. |
Once you've got this system down, packing your diaper bag will become second nature. This core setup ensures you’re ready for just about anything an average day can throw at you.
For an even more detailed breakdown, especially if you have a brand-new baby, be sure to check out our complete newborn diaper bag checklist. It dives even deeper into the specific needs of the littlest adventurers.
Organization Hacks to Avoid the Black Hole Effect
We’ve all been there—frantically digging through a bottomless pit of crumpled onesies and loose Goldfish crackers while a baby meltdown gains momentum. I call this the "Black Hole Effect," and we're going to put an end to it, right now.
Having a packed diaper bag is one thing, but having an organized one is a true parenting superpower. The secret isn't just what you pack, but how you pack it. A few simple strategies can transform your bag from a jumbled mess into a perfectly organized command center, letting you find what you need in seconds.
Embrace the Power of Pouches and Kits
Think of your diaper bag not as one giant container, but as a mothership for smaller, mission-specific kits. Using clear or color-coded packing pouches is honestly the single best way to keep things tidy and accessible. Instead of everything floating around loose, you create dedicated zones.
Here’s how I like to build out my kits:
- The Diapering Kit: This is your most-used pouch, no question. It should hold a few diapers, a travel pack of wipes, a small tube of diaper cream, and a couple of disposable bags for the dirty ones. When it's time for a change, you just grab this single pouch instead of lugging the entire diaper bag to the restroom.
- The Feeding Kit: Group together bottles, pre-measured formula, a burp cloth, and any other feeding accessories. For toddlers, this is where you'll stash their snacks, a sippy cup, and a bib.
- The First-Aid/Clean-Up Kit: This little pouch is for all the minor, unexpected messes and scrapes. Pack it with baby-safe hand sanitizer, antiseptic wipes, bandages, infant pain reliever, and a nasal aspirator.
- The Spare Clothes Kit: Roll up a complete spare outfit—think onesie, pants, and socks—and stick it in its own pouch or a wet/dry bag. This keeps it clean, compact, and ready for a diaper blowout emergency.
What’s brilliant about this method is that you only need to restock the specific kit you used, not repack the whole bag every single time you get home. For more great ideas on keeping things orderly, check out our favorite nursery organization hacks that work just as well for your bag.
Master the Top-Down Packing Method
Once your kits are assembled, it's time to load the bag strategically. The "Top-Down" method is simple but incredibly effective. It’s all about accessibility based on urgency.
Think about what you need in a hurry. Pacifiers? Wipes? Your keys? Those are your top-tier items.
- Bottom Layer: At the very bottom, place the items you'll use least often. This is the perfect spot for your spare outfit kit and maybe a larger blanket or nursing cover. They’re important to have, but you won’t need them in a split second.
- Middle Layer: This is for your main kits—the diapering pouch and the feeding pouch. They are still easy to get to but aren't needed with the same lightning speed as a pacifier that’s just fallen on the floor.
- Top Layer & Outer Pockets: This is prime real estate for your most critical, frequently used items. Wipes, pacifiers, a favorite teether, your phone, wallet, and keys should all go here. Make full use of those glorious exterior pockets!
The goal is simple: never again have to empty half your bag on a public changing table just to find the diaper cream. Strategic placement turns frantic searching into a calm, confident grab.
Pro Tips for Maintaining Order
Keeping your diaper bag organized is an ongoing process, but these little tricks make it almost effortless. You'll thank yourself later when you're navigating a busy airport or a crowded cafe.
A Quick Guide to Staying Organized
| Strategy | Why It Works | Real-World Example |
|---|---|---|
| Color-Code Your Pouches | Your brain processes color faster than text. It lets you grab the right kit without even thinking. | Blue for diapering, green for feeding, red for first-aid. You'll instinctively know which one to reach for. |
| Do a Weekly "Reset" | This prevents the slow buildup of trash, old snacks, and items you no longer need. | Every Sunday night, take five minutes to empty out old receipts, wipe down the interior, and restock essentials. |
| Use a "One In, One Out" Rule | This ensures you're never caught without a key item and keeps your inventory consistent. | After using the last diaper from your pouch on an outing, immediately add "restock diapers" to your to-do list. |
By adopting these organizational hacks, your diaper bag will stop being a source of stress and become one of your most reliable parenting tools. You'll be amazed at how much calmer you feel knowing that everything you need is exactly where it should be.
Adapting Your Pack for Different Outings
Once you've nailed your everyday diaper bag setup, you're in a great spot. But let's be real—no two days with a little one are the same. A quick run to the post office requires a vastly different set of supplies than a full day at the zoo or, the final boss of parenting, a cross-country flight.
The secret to a well-packed bag isn't just about cramming more stuff in for longer trips. That’s a one-way ticket to a sore shoulder and a chaotic mess. The real pro move is to thoughtfully adjust what you carry based on where you're going and for how long.
A great rule of thumb is to let urgency dictate placement. Think about what you'd need in a full-blown meltdown or a sudden blowout. Those are your "grab-and-go" items.
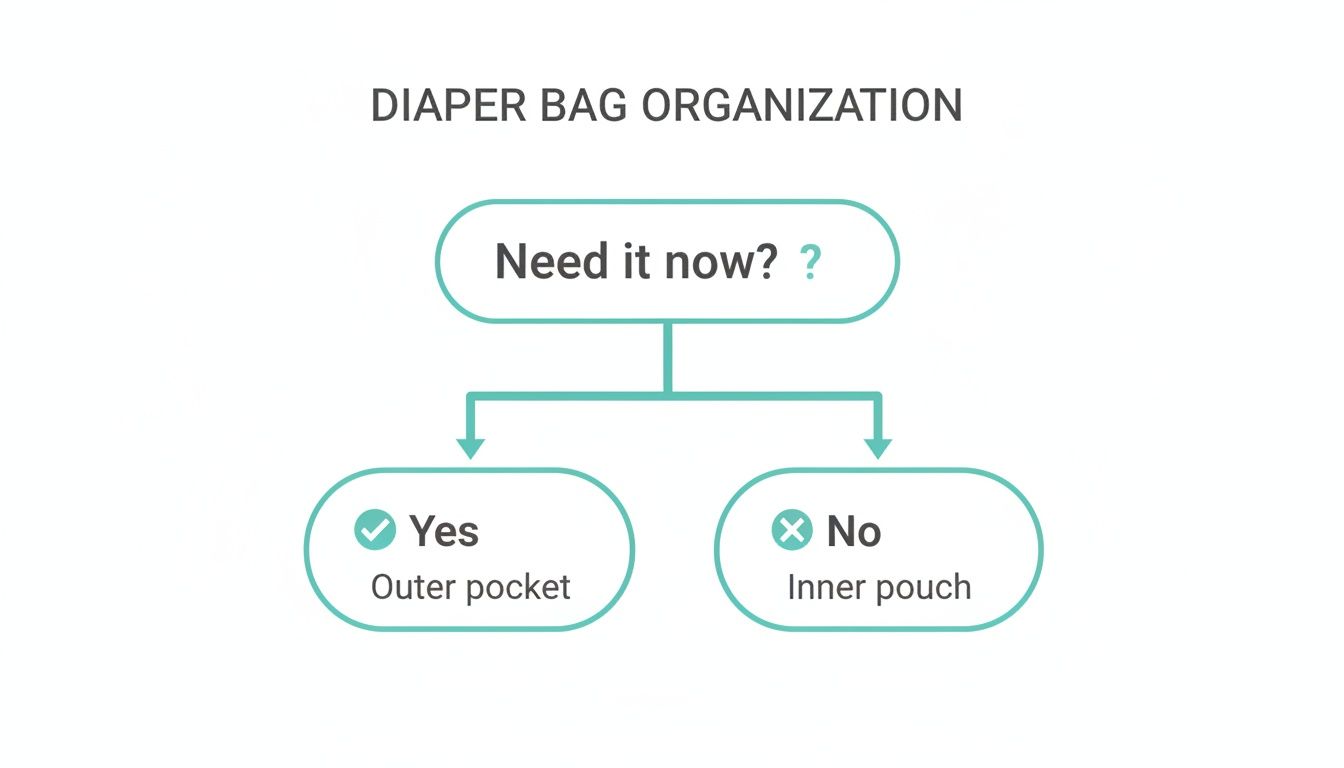
This simple idea—immediate-need items in outer pockets, everything else inside—is the foundation of staying calm and organized when things get hectic.
To get a clearer picture of how your packing list might change, here’s a quick side-by-side look.
Packing for Different Outings At-a-Glance
| Item Category | Quick Errand (1-3 Hours) | Full Day Out (4-8+ Hours) | Overnight Stay |
|---|---|---|---|
| Diapering | 2-3 diapers, small wipes pack | 8+ diapers, full wipes pack, cream | 12+ diapers, wipes, cream |
| Clothing | 1 spare outfit | 2-3 spare outfits, weather gear | 3+ outfits, PJs, sleep sack |
| Feeding | 1 bottle/nursing cover, 1 snack | Multiple bottles/meals, various snacks, water | Full day's worth of food, plus extra |
| Entertainment | 1 small toy/teether | 3-4 varied toys/books | Favorite toys, comfort item ("lovey") |
| Health/Safety | Sanitizer, pacifier | Small first-aid kit, sunscreen | Full toiletries (wash, lotion, etc.) |
As you can see, it's less about a whole new bag and more about scaling up what you already have while adding a few situation-specific essentials. Let's dig into the details.
The Full-Day Adventure Pack
When you're out from morning 'til evening, you're not just packing for emergencies; you're packing for multiple feedings, at least one nap, and a much higher chance of a wardrobe catastrophe. This is where you bulk up your core supplies without going overboard.
Think through the day's schedule. What will you be doing around lunchtime? Naptime? You need more of everything, plus some better distractions.
- Up the Diaper Count: A good starting point is one diaper for every hour you plan to be out, plus a buffer. For an 8-hour day, pack 11 diapers to be safe. Trust me, you'll be glad you did. A full pack of wipes is non-negotiable here.
- Double Down on Outfits: One spare outfit is good; two is better. After one blowout, the last thing you want is to be caught without another clean onesie.
- Pack for Multiple Meals: If you use formula, bring enough for every feeding you'll miss at home, plus one extra. For older babies and toddlers, this means packing a variety of snacks and a full meal to avoid meltdowns.
- Bring Better Toys: That one little teether isn't going to cut it for six hours. Pack a few different items—a soft book, a favorite little stuffed animal, maybe some stacking cups—to rotate through and keep things interesting.
For a full day out, your goal is to have "more of the basics, plus better boredom busters." You’re not just trying to survive the day; you're trying to make it fun for everyone.
The Overnight Stay Pack
Heading to the grandparents' house for the night is a whole different ballgame. You're packing for a full 24-hour cycle, which means covering everything from dinner and bath time all the way through to breakfast the next morning.
You'll need everything from the full-day pack, but with some crucial additions for sleeping and morning routines.
- Pajamas: A familiar, cozy pair of PJs can work wonders for helping a baby settle down in a new environment.
- Sleep Sack or Swaddle: This is a huge sleep cue for many babies. Forgetting it can lead to a very long night.
- Toiletries: Don't forget their baby wash, lotion, toothbrush, and toothpaste. It’s the little routines that make a strange place feel like home.
- Night-Time and Morning Feedings: Pack more formula or bottles than you think you'll need. Running out at 3 a.m. is a nightmare you don't want to live through.
- The Comfort Item: Whatever it is—a "lovey," a specific pacifier, a worn-out blanket—it's non-negotiable. This is their security in an unfamiliar place.
The Travel Pack for Planes and Road Trips
Traveling is the ultimate test of your diaper bag skills. Space is limited, access can be tricky, and you’re essentially trapped for long stretches. The focus here shifts to efficiency, TSA rules, and screen-free entertainment that won't annoy everyone around you.
On a road trip, you have more freedom with liquids, but keeping things organized and within arm's reach is everything. For more ideas on how to set up your car for success, check out our guide on the perfect family road trip packing list.
Air travel, however, comes with its own set of rules. Here’s what to prioritize for your carry-on diaper bag:
- TSA-Friendly Liquids: The good news is that formula, breast milk, and toddler drinks are exempt from the 3.4oz rule. The catch? You have to declare them and have them screened separately, so keep them in a clear, easy-to-access pouch to make security less of a headache.
- All the Snacks: Pack way more than you think you need. Then pack a few more. A new, exciting snack can be the perfect distraction during a fussy moment.
- Brand New Toys: This is the time to unveil that new little toy or book you've been hiding. The novelty factor can buy you a solid chunk of peaceful travel time.
- Help for Their Ears: For takeoff and landing, have a bottle, pacifier, or sippy cup ready. The sucking motion helps equalize the pressure in their ears and prevents the pain that can cause screaming fits.
- Empty Plastic Bags: They take up zero space and are endlessly useful for stashing trash, containing a soiled outfit, or just keeping small things from getting lost at the bottom of the bag.
For a deeper dive into managing all the logistics of a big trip, the ultimate guide to traveling with kids is a fantastic resource that covers everything beyond the diaper bag. By learning to tweak your packing for each scenario, you'll feel less like you're just hauling stuff and more like a calm, confident parent who's ready for anything.
Keeping Your Diaper Bag Clean and Safe
Let’s be real—a diaper bag is ground zero for spills, crumbs, and the occasional mystery goo. It’s a true workhorse, but keeping it clean is just as crucial as packing it right. After all, this is where you keep your baby's food, fresh clothes, and toys. A little routine maintenance goes a long way in making sure your bag is a safe, hygienic space for all those essentials.
Think of diaper bag cleanliness as a non-negotiable. It’s not just about appearances; it’s about stopping germs in their tracks and making sure everything from bottles to pacifiers stays sanitary for your little one.
Contain the Chaos with a Wet/Dry Bag
If I could recommend one single item to make your life easier, it would be a wet/dry bag. Seriously, this simple pouch is a total game-changer for handling the messes that are bound to happen when you're on the go.
Most wet/dry bags have two separate zippered sections: one with a waterproof lining for soiled clothes and another for clean, dry items. This is your secret weapon for quarantining the aftermath of a diaper blowout or a massive spit-up incident. No more wadding up a dirty onesie in a plastic bag!
Here’s why it’s a must-have:
- It traps odors. A dirty outfit sealed in a wet bag won't stink up everything else.
- It prevents leaks. The waterproof lining means a damp swimsuit or leaky bottle won’t soak the rest of your gear.
- It keeps clean things clean. You can store a fresh backup outfit in the dry pocket with total confidence, knowing it’s protected from the mess.
Safely Packing Milk and Formula
When you’re carrying breast milk or formula, temperature is everything. Many diaper bags now come with insulated pockets built right in, which are fantastic for keeping bottles cool for a couple of hours.
For longer outings or hot days, you'll want to toss a small, slim ice pack into that insulated pocket. Just place the bottle or milk storage bag right up against the ice pack to keep it properly chilled.
The rule of thumb for expressed breast milk is that it can be stored with an ice pack for up to 24 hours. When in doubt, always follow the CDC's guidelines for safe handling and storage to protect your baby.
As soon as you get where you're going, pop the milk into a refrigerator if one is available. It's a simple step that ensures it stays fresh and safe.
Building a Baby-Safe First-Aid Kit
You don’t need to haul a paramedic's kit around, but having a small, baby-focused first-aid kit can bring so much peace of mind. I find it’s better to build your own rather than buy a pre-made adult one, so you know it has exactly what you need for a little one.
Grab a small, clearly labeled pouch and stock it with these essentials:
- Infant Acetaminophen or Ibuprofen: For fevers or pain (always check with your pediatrician about dosage first!).
- Antiseptic Wipes: Perfect for cleaning minor scrapes before putting on a band-aid.
- Assorted Bandages: A few with fun characters can work miracles for distracting a toddler from a tiny owie.
- Nasal Aspirator: The "snot sucker" is a lifesaver for clearing a stuffy nose, especially for infants who can't blow their own.
- Saline Nasal Drops: Helps loosen up stubborn mucus before you use the aspirator.
This little kit prepares you for the most common bumps and sniffles without adding a ton of weight to your bag.
The Weekly Reset Routine
To stop your diaper bag from slowly descending into chaos, a quick weekly reset is your best friend. All it takes is five minutes every Sunday evening to get your bag ready for the week.
- Empty It Out: Dump everything from the main compartment and all the pockets. You'll be amazed at what you find lurking at the bottom!
- Clean It Up: Shake out all the crumbs and toss any old receipts or wrappers. Grab a baby-safe wipe to clean the interior lining and wipe down the changing pad.
- Restock and Reorganize: Take a quick inventory. Refill your wipes container, restock your diaper supply, and swap out the spare outfit if your baby just moved up a size.
This simple habit keeps your bag from becoming an overwhelming mess and ensures you’re always ready to walk out the door. It’s a quick win that makes a huge difference.
Answering Your Biggest Diaper Bag Questions
Even after you've packed your bag a hundred times, questions pop up. It happens to all of us! Let's get into some of the most common things parents wonder about, so you can walk out the door feeling like you've got this handled.
How Many Diapers Do I Really Need for a Day Out?
This is the golden question, isn't it? No one wants to be caught in a messy situation without a fresh diaper. It’s the ultimate rookie mistake.
Here’s a rule of thumb that has never failed me: pack one diaper for every hour you think you'll be gone, then add two or three extra just in case. If you've got a newborn, maybe even add a couple more to that backup stash—they go through them at a shocking pace.
Trust me on this one: it's always, always better to come home with a few extra diapers than to run out when you need one most.
This simple formula works for any outing. A quick three-hour run to Target? That’s five diapers. A full eight-hour day visiting family? You’re looking at about eleven. It sounds like a lot, but you'll be thankful for that buffer when a surprise blowout happens.
What’s the Difference Between Packing for a Toddler vs. an Infant?
The basics stay the same, but the focus of your bag definitely shifts as your tiny baby turns into a walking, talking toddler. You're still on diaper duty, but the supporting cast of items changes quite a bit.
With an infant, your bag is heavy on feeding gear—bottles, formula, burp cloths, maybe a nursing cover. Entertainment is pretty simple; a pacifier or a single teether often does the trick.
Once you’re packing for a toddler, things look a little different:
- Snacks Become a Priority: The bottle gets replaced by an arsenal of snacks. Goldfish, granola bars, fruit pouches—you name it. A sippy cup of water is also non-negotiable.
- Entertainment Levels Up: A simple rattle won't cut it anymore. You'll need more engaging distractions like a mess-free coloring book, a favorite toy truck, or a sticker sheet to keep them busy.
- First-Aid Gets More Use: With a toddler on the move, bumps and scrapes are just part of the adventure. Your first-aid kit will likely have more band-aids and antiseptic wipes than ever before.
Is a Special "Diaper Bag" Actually Necessary?
Honestly? Nope. You can absolutely make a regular backpack or a cute tote work. But... a bag designed specifically for parents can be a game-changer.
These bags are built for the beautiful chaos of life with kids, and they often have features that just make things easier, like:
- Insulated pockets to keep a bottle warm or a drink cool.
- A built-in changing mat that you can wipe down easily.
- Tons of compartments, so your keys don’t get lost in a sea of diapers and wipes.
- Handy stroller straps that free up your hands (and save your back).
So, while you don't need one, the thoughtful design of a dedicated diaper bag can seriously reduce your stress levels, especially in those early days when everything feels overwhelming. So what's your take? Is a dedicated diaper bag a must-have or a nice-to-have? Share your thoughts in the comments below!
Ready to tackle any outing with confidence? The key is having gear that works as hard as you do. Hiccapop designs smart, reliable products—from travel boosters to nursery organizers—that take the stress out of parenting so you can focus on the moments that matter. Explore our solutions and make parenting a little easier.