


How to Organize a Nursery: Tips for a Calm, Functional Space
Getting a nursery organized really boils down to a simple, three-part strategy: clear the clutter, map out your key activity zones, and then pick storage that makes sense. Following this path from the start is the best way to keep the room from turning into a chaotic dumping ground for baby gear. The goal is to create a calm, intuitive space where everything has a purpose and a place, making life with a newborn just a little bit easier.
Creating Your Nursery Blueprint
Before you even think about buying those adorable bins and baskets, you need a plan. A solid blueprint is what turns an empty room into a functional, peaceful nursery. The idea is to create a layout where everything has a home and every daily routine—sleeping, changing, feeding, playing—has its own dedicated spot.
Think of yourself as the architect of your baby’s first little world. A great nursery layout isn't just about aesthetics; it's about flow. Seriously, ask yourself: can I get from the crib to the changing table at 3 AM without tripping over something? Is everything I need for a diaper change within arm's reach? Thinking through these scenarios now will save you a world of frustration later.
Map Out Your Nursery Zones
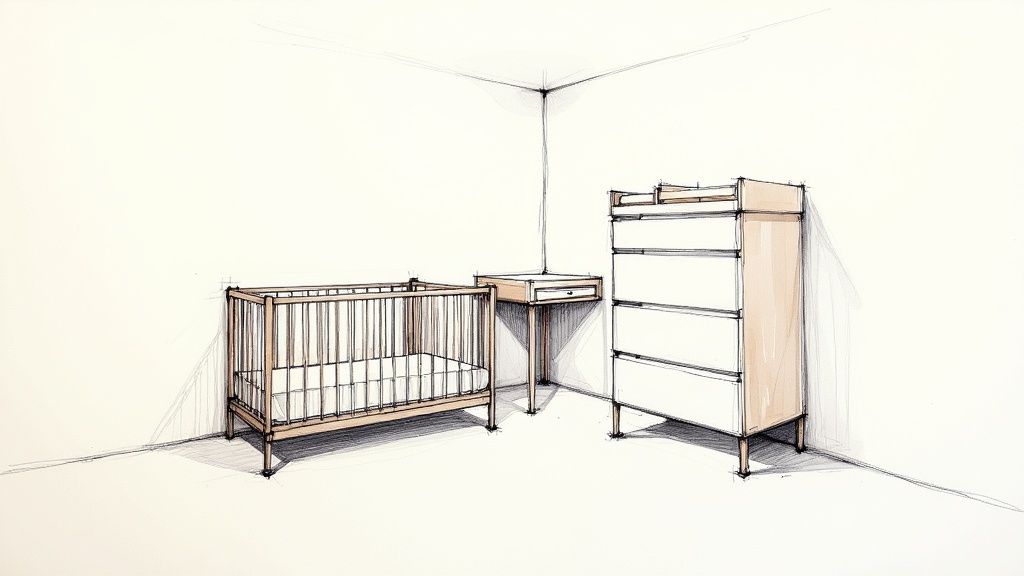
First things first, clear the room out completely. A blank slate makes it so much easier to visualize the space without any distractions. From there, pinpoint the main things you'll be doing in this room. For most of us, that means creating four key zones:
- The Sleep Zone: This should be the calmest corner, with the crib as the centerpiece. You’ll want to keep this area free of loud toys or distracting electronics.
- The Changing Zone: This is mission control for all things diapers. It needs to be incredibly organized, with every essential just an arm's length away.
- The Feeding Zone: Think a comfy chair or glider for those late-night feeds. A small side table is a lifesaver for holding bottles, burp cloths, or your phone.
- The Play Zone: This is the fun spot! Designate an area with a soft rug for tummy time and keep toys and books neatly stored here.
This simple infographic gives you a great visual for how to measure your room and assign space for each zone.
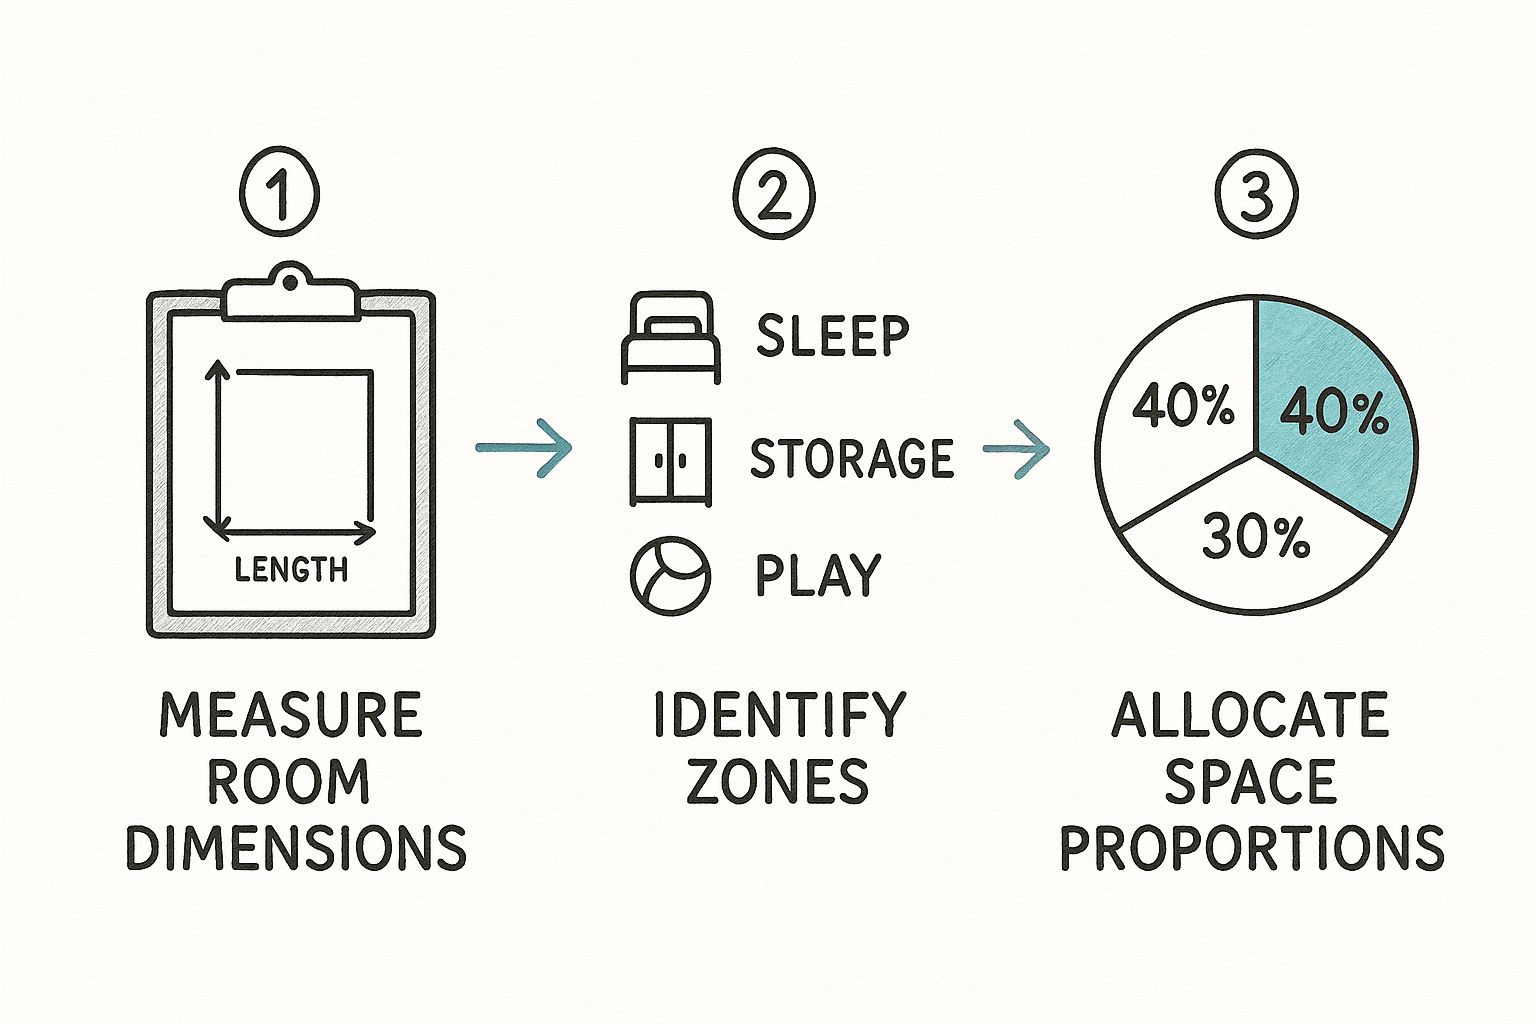
As you can see, thinking about what percentage of the room is dedicated to sleeping versus storage or play helps create a really balanced feel. It prevents one activity from completely taking over the space.
To help you get started, here's a quick reference table for planning your own zones.
Nursery Zone Planning Guide
| Zone | Primary Function | Essential Items | Organizational Goal |
|---|---|---|---|
| Sleep Zone | Resting & Sleeping | Crib, blackout curtains, sound machine | Create a tranquil, safe, and uncluttered sleep environment. |
| Changing Zone | Diapering & Dressing | Changing table/pad, diapers, wipes, cream, clothing | Keep all supplies within immediate reach for safe, efficient changes. |
| Feeding Zone | Nursing & Bottle-Feeding | Glider/rocker, side table, burp cloths, nursing pillow | Ensure comfort and have all feeding necessities easily accessible. |
| Play Zone | Development & Fun | Play mat, low shelves for toys, book storage | Provide a safe, stimulating area that encourages independent play. |
This table acts as a simple cheat sheet to make sure you have the right items in the right place, all while keeping your organizational goals in mind.
Stocking Your Space Smartly
Once your zones are mapped out, you can start bringing in the furniture and supplies. This is where a checklist is your best friend. Instead of buying things on a whim, you can strategically place each item right where you'll use it. For a complete rundown of what you'll actually need, take a look at our list of essential baby items.
A well-organized blueprint ensures every single thing you buy has a purpose and a place, setting you up for a peaceful and functional nursery from day one.
Designing an Efficient Changing Station
Let's be honest, the changing station is the real command center of the nursery. You're going to spend a lot of time here, so making it ultra-efficient isn't just a nice-to-have—it's a sanity-saver. The entire goal is to have everything you could possibly need within arm's reach, so you never have to take a hand off your baby.
Whether you've opted for a dedicated changing table or are repurposing a dresser with a topper pad, the core principles don't change. Function and safety always, always come first. Walk through the motions in your head: one hand stays on the baby while the other grabs wipes, a fresh diaper, and maybe some cream. Can you get to everything without twisting, turning, or stepping away?
Maximize Your Storage
It’s amazing how quickly a drawer can devolve into a jumbled mess of creams, diapers, and those impossibly tiny socks. My secret weapon has always been a good set of drawer dividers. They create instant order out of chaos, letting you neatly separate diapers by size, sort creams from ointments, and keep everything in its own little home. This simple fix transforms a chaotic drawer into a logical, easy-to-use space.
But don't just think horizontally—you need to go vertical, too.
- Tiered Carts: A small, wheeled cart tucked next to your changing table is an absolute game-changer. I love using these to hold the things I grab most often, like a day's worth of diapers, a pack of wipes, and my go-to diaper rash cream.
- Floating Shelves: Installing a couple of small shelves above the changing station keeps essentials visible and accessible for you, but safely out of your baby’s curious grasp. This is the perfect spot for extra supplies or a few cute decorative pieces.
Using vertical space like this frees up the main changing surface, keeping it clear and ready for action.
Pro Tip: Put together a mobile 'diaper caddy.' It's just a small, portable basket stocked with a few diapers, a travel pack of wipes, a foldable changing pad, and cream. You can grab it and take it to the living room or wherever you are, saving you countless trips back to the nursery for every single change.
The Great Dresser vs. Table Debate
One of the big questions parents ask is whether to buy a dedicated changing table or just use a long-lasting dresser with a changing pad on top. From experience, a dresser is often the more practical choice because it grows with your child. Once they're out of diapers, you just remove the pad, and you've got a piece of furniture that will last for years.
If you go the dresser route, make sure the changing pad is securely anchored to the back to prevent any slipping. Safety is non-negotiable here. The top drawer should be reserved exclusively for diapering supplies so you can grab what you need in seconds.
Finally, let’s talk diaper pail. Position it right next to the changing station for an easy, no-fuss toss. I always recommend a model with a foot pedal to keep both of your hands free. An efficient station thinks through the entire process, from start to finish—including the final cleanup. By optimizing this one small zone, you make one of parenting’s most repetitive tasks so much smoother.
Taming the Baby Clothes Chaos
Let's be real: baby clothes are adorable, tiny, and seem to multiply overnight. Before you know it, you're staring at a mountain of onesies and sleepers. Getting a handle on this clothing chaos is one of the best things you can do for a calm, organized nursery. A solid system means you can find exactly what you need in seconds, even when you're fumbling around after a 3 AM diaper disaster.
The very first thing to do? Sort every single piece of clothing by size. I know it sounds basic, but it's the golden rule. It's the only way to avoid that sinking feeling when you discover a super-cute outfit your baby never got to wear because it was buried at the bottom of a drawer.
Master the Closet and Drawers
For anything that needs hanging, grab some slim-profile baby hangers—they really do save a surprising amount of space. Then, add a set of closet rod dividers labeled by size: Newborn, 0-3 Months, 3-6 Months, and so on. This is such a simple trick, but it makes a huge difference. You can see your entire inventory for each stage at a glance.
Now, for everything else, drawers are your best friend. But without a plan, they quickly turn into a jumbled mess. The secret weapons here are drawer dividers and a specific folding method.
- Drawer Dividers: These are non-negotiable for creating tidy, dedicated zones. Think one section for pants, another for short-sleeve onesies, and a separate one for sleepers. No more chaos.
- File Folding: This technique is a total game-changer. Instead of stacking clothes flat, fold each item into a neat little rectangle and stand it up vertically, just like files in a cabinet. When you open the drawer, you can see every single item instantly.
Combining drawer dividers with file folding is one of my favorite nursery hacks. It not only maximizes your storage but also gives you a perfect visual inventory. You’ll never have to frantically dig for that specific pair of leggings again.
The Two-Bin System for Growth Spurts
Babies grow at a truly astonishing speed. Those newborn pants that fit perfectly yesterday are suddenly too short. The key to managing this constant turnover is a simple two-bin system, which you can tuck right into the closet or under the crib.
- The "Next Size Up" Bin: This is where you'll stash all the clothes for the next size range. When you get gifts or snag a good deal on future sizes, just wash them and pop them straight in here. When your baby is ready, their new wardrobe is clean and waiting.
- The "Outgrown" Bin: As soon as you notice an item is too snug, toss it into this bin. Once the bin is full, you can sort through it and decide what to store, donate, or sell. This keeps the outgrown stuff from cluttering up the clothes you're actually using.
A Place for Everything Else
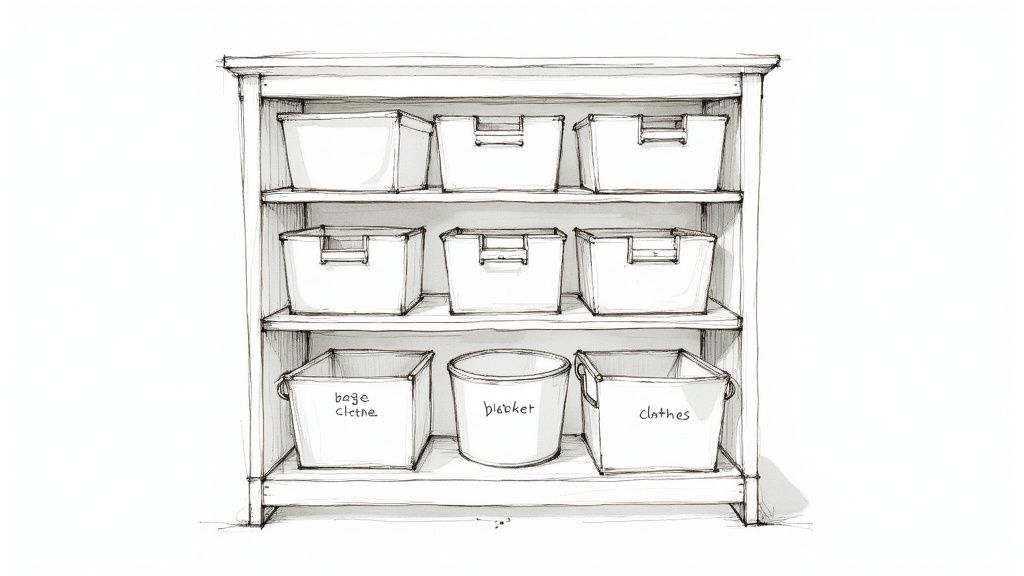
Beyond the main clothing items, you'll have a collection of hats, socks, bibs, and swaddles. These little things get lost easily, so I recommend using small baskets or bins to contain them on a shelf or inside a drawer.
If your changing table is across the room from the closet, a hanging nursery organizer can be a lifesaver for streamlining your routine. Stock it with a few backup outfits, diapers, and wipes. A great example is the hiccapop Nursery Organizer, which keeps all those daily must-haves within arm's reach.
Ultimately, this whole approach is about creating a fluid system that works for you. With everything sorted by size and a plan for managing incoming and outgoing clothes, you’ll spend less time searching and more time soaking up all those sweet baby moments.
Smart Storage for Toys and Books
As your baby grows, their collection of toys and books will seemingly explode overnight. One day you have a few soft rattles, and the next, you’re navigating a sea of blocks and board books. The secret is to create storage systems that can evolve right alongside them, turning potential chaos into organized fun.
This is where a good cube storage unit becomes your absolute best friend. They are incredibly versatile and perfect for a growing child’s room. Just add some soft, collapsible fabric bins, and you've got a perfect system for stashing everything from stuffed animals to building blocks.
Beyond the usual nursery items, managing toys and books can be a real challenge. For some great ideas on using your space well, you might find inspiration by checking out these top storage solutions for small homes.
Create a Cozy Reading Nook
Fostering a love for reading starts early, and an inviting little nook can make all the difference. The best way I've found to get little ones interested in books is to use forward-facing bookshelves. When kids can see those bright, colorful covers, they're far more likely to grab a book and start exploring.
In fact, research from the Journal of Early Childhood Literacy found that children's book selection is highly visual. If they can see the front cover, they are 60% more likely to pick it up.
Here’s how to create a simple, effective reading spot:
- Use Wall-Mounted Ledges: These shallow shelves are perfect for displaying books with the covers facing out.
- Add Comfy Seating: A soft rug, a few floor pillows, or a small beanbag chair instantly makes the corner feel special and comfortable.
- Keep it Accessible: Make sure the shelves are low enough for your child to easily reach and choose their own stories.
This dedicated spot not only keeps books organized but also frames reading as a fun, independent activity.
Clever Solutions for Everything Else
Of course, it’s not just the big toys and books that need a home. You'll also have a growing collection of miscellaneous items like blankets, swaddles, and all those tiny shoes. This is where you get to be clever with your storage.
My favorite trick for all the small stuff is an over-the-door pocket organizer. It’s fantastic for storing baby shoes, hats, or even small stuffed animals without taking up any precious floor or shelf space.
For bulkier items like extra blankets and swaddles, designated baskets are a lifesaver. You can tuck a large woven basket into a corner or slide a few under the crib. This keeps them tidy but still within arm's reach when you need them.
Ultimately, the goal is to build simple systems that are easy for you to maintain now and, eventually, for your toddler to use themselves. When a child knows exactly where their toys and books belong, you're teaching them the basics of tidying up from the very beginning. This foundation helps a play zone stay a place of joy, not a source of clutter. To dive deeper into this, we have a whole guide on what makes a great play space.
Keeping Your Nursery Organized for the Long Haul
Getting the nursery perfectly organized before the baby arrives is one thing. Keeping it that way through diaper blowouts, growth spurts, and the beautiful chaos of daily life? That's the real challenge.
An organized nursery isn't a one-and-done project. It's a living, breathing system that has to evolve right alongside your child. The secret is to create simple, flexible routines that stop clutter before it even starts, keeping the room a peaceful sanctuary for you both.
A trick I swear by is the 'one in, one out' rule, especially for toys and clothes. When a new board book or adorable onesie comes in, an older one gets donated or packed away. This simple habit keeps collections from spiraling out of control.
Building Routines That Actually Stick
Forget perfection—consistency is what really matters here. You don't need to dedicate hours to tidying up. Instead, weave small, manageable habits into your day until they become second nature.
A quick 10-minute "reset" at the end of the day can make all the difference. This isn't a deep clean. It’s just about putting stray toys back in their baskets, folding the blanket on the glider, and restocking the diaper caddy for the night. Making this part of your wind-down routine means you wake up to a fresh space, which honestly does wonders for your state of mind.
The goal is to make tidying up so easy that it requires almost no thought. When everything has a designated home, a 10-minute reset is all it takes to restore order and calm to the room.
Beyond the daily reset, I recommend a quick monthly check-in. Just take 30 minutes to see what’s working. Are the dresser drawers a total mess? Are some bins overflowing? This is your chance to catch small organizational issues before they turn into a weekend-long project.
Adapting as Your Baby Grows
The nursery you designed for a newborn won't work for a crawling baby, let alone a curious toddler. Being ready to adapt your system is the key to staying organized for years, not just months.
- The Changing Station: Once your little one outgrows the changing table, that space gets a new life. The top of the dresser can become a spot for books and special toys, or you can repurpose the whole area into a "big kid" wardrobe.
- Toy Storage: Soft bins are perfect for babies, but a toddler might do better with low, open shelves where they can see their toys. Labeled containers also help them start learning where everything belongs.
- Accessibility: As they grow, lower hooks and shelves so your toddler can start helping put things away. It’s amazing how proud they are when they can hang up their own little jacket or put a book back on the shelf.
These aren't huge projects—just small, intentional tweaks that keep the room functional for whatever stage your child is in. If you're looking for ideas on how to apply these principles to the rest of your house, there are great guides on how to organize a home with kids and pets.
By staying flexible and building simple habits, you can make sure the nursery remains a calm, functional, and joyful space for years to come.
Common Questions About Nursery Organization
Even the most thought-out plan can leave you with a few lingering questions. Let's tackle some of the most common hurdles parents face when organizing a nursery, so you can feel confident your space is ready for anything.
How Do I Organize a Nursery in a Small Space?
When you’re short on square footage, the name of the game is going vertical. Every inch of wall space is prime real estate that can help you keep the floor clear and make the room feel bigger than it actually is.
- Think Up, Not Out: Opt for tall, narrow bookshelves instead of wide, bulky ones. Floating shelves installed above the dresser are perfect for holding a diaper caddy, wipes dispenser, or a few cute decorative items. And don't underestimate the power of an over-the-door organizer—it’s a game-changer for storing shoes, hats, and all those little odds and ends without taking up a single inch of floor space.
- Embrace Multi-Functional Furniture: Look for pieces that can pull double duty. A crib with built-in drawers underneath is a brilliant storage solution. A simple storage ottoman can be a footrest for your glider and a secret spot to stash extra blankets or burp cloths.
- Get Things Off the Surfaces: Wall-mounted solutions are your best friend here. A dispenser for diapers or a small caddy for creams and lotions can free up the entire surface of your changing table, dedicating it solely to the task at hand. The less clutter on surfaces, the more spacious and serene the room will feel.
What Are the Best Storage Containers for a Nursery?
I've found the best strategy is a smart mix of open and closed storage. This keeps everyday essentials within arm's reach while letting you tuck away the messier stuff.
Soft fabric bins are my go-to for toys. They're safe for curious babies, light enough for toddlers to manage on their own later on, and they squish perfectly into cube organizers. For all those tiny baby clothes, drawer dividers are non-negotiable; they turn a chaotic jumble of onesies and socks into a perfectly organized system.
Inside the closet, I always recommend clear, stackable bins. Use them for clothes the baby hasn't grown into yet or for out-of-season items. Being able to see what’s inside at a glance saves you from having to unstack and rummage through every single box. For items you want to keep on open shelves, woven baskets add a beautiful, warm texture while hiding the clutter. And a tiered rolling cart? It's incredibly versatile for creating a mobile diapering or feeding station that you can wheel from room to room.
A truly organized nursery isn't about finding one perfect type of container. The magic is in the mix—using different bins and baskets for different jobs. Combining fabric bins, clear containers, and woven baskets creates a system that’s both functional and beautiful.
When Should I Start Organizing the Nursery?
The second trimester is often called the "sweet spot" for a reason. Your energy is usually at its peak, making it the perfect time to roll up your sleeves and get things done without feeling rushed.
Try to have the big furniture—the crib, dresser, and glider—assembled by around 30 weeks. This gives you a solid foundation to build upon. From there, you can spend the next few weeks, from 30 to 36 weeks, focusing on the details. This is when you'll wash all the tiny clothes, stock the changing station, and find a home for everything.
Finishing up by the 36-week mark is a great goal. It helps you sidestep that last-minute panic and gives you time to just relax and mentally prepare for your baby's arrival.
How Do I Keep the Nursery Tidy After the Baby Arrives?
The secret here is to create systems that are almost ridiculously easy to maintain. When you're sleep-deprived and running on fumes, a complicated organization routine is the first thing to go out the window.
Get into the habit of a quick, 5-minute "reset" each evening. This isn't about deep cleaning; it's just about putting a few stray items back where they belong. Keep a dedicated "outgrown" bin right in the closet. The second you notice a onesie is getting a little snug, toss it in there. Don’t even put it back in the drawer. For toys, the "one in, one out" rule is a lifesaver for preventing a complete takeover.
Most importantly, give yourself some grace. Some days will be messier than others. If a system isn't working for your family, don't be afraid to switch it up. A good-enough system that you can stick with is always better than a "perfect" one you can't maintain.
A well-organized nursery does more than just look nice—it simplifies your daily life, giving you more time to focus on what really matters. At Hiccapop®, we design products to help you create a safe, functional, and peaceful space for your little one. From nursery organizers to travel essentials, we’re here to support you on your parenting journey. What's your number one nursery organization challenge? Share it in the comments below